iOS 14부터 달라진 앱에서 이메일 보내는 방법
iOS 14에서 달라진 앱에서 이메일 보내는 방법을 알아봅시다
iOS 14에서는 기본 이메일 앱이 아닌 다른 서드파티 앱을 기본 이메일로 설정할 수 있습니다. 즉, 지메일, Outlook, Spark 등의 메일 앱을 이제 기본 이메일 앱으로 대체할 수 있습니다.
이로 인해 앱에서는 기본적으로 메일 앱으로 보내는 방식에서, 대응할 앱을 추가로 보낼 방법을 지원해야 합니다. 예를 들어, 앱을 사용하다가 버그 혹은 문의에 대해서 이메일 보내기를 했을 때, 사용자가 기본 메일 앱이 있으면 기본 메일 앱으로 보내지만, 없다면 지메일 혹은 다른 서드파티 이메일 앱을 통해서 보낼 수 있게 해야 합니다. 만약 사용자가 사용하는 이메일 앱에 대응할 수 없다면 안내 팝업을 띄워주면 사용자가 다른 방법을 통해서 이메일 보낼 수 있게 안내해주면 좋을 것 같습니다. 오늘 글에서 어떻게 코드를 작성할지 소개하겠습니다.
기본 이메일 앱으로 보내는 방법
 이메일 구성 인터페이스
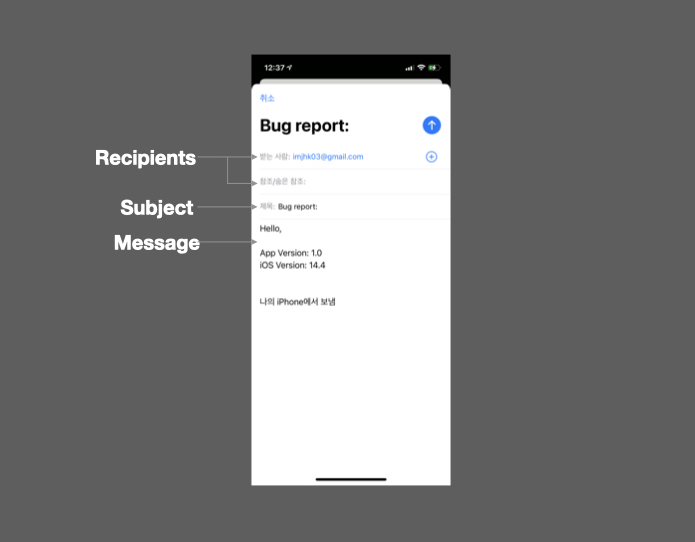
애플에서 제공하는 라이브러리 중에 MessageUI 프레임워크 안에 MFMailComposeViewController를 이용해서 기본 이메일 앱을 통해서 이메일 보내는 것을 다룹니다. 받는 사람, 제목, 메시지 내용을 담아서 화면을 보여주지만, 이메일을 보내지 않습니다. 사용자가 보내기 액션을 취하면 그때 이메일이 보내집니다. 아래 예제 코드입니다.
1
2
3
4
5
6
7
8
9
10
11
12
13
14
15
16
17
18
19
20
21
22
23
24
25
26
27
28
29
30
31
32
33
34
35
import MessageUI

class ViewController: UIViewController {

    ...

    func sendEmail() {
        let composer = MFMailComposeViewController()
        let receiver = "imjhk03@gmail.com"
        let subject = "Bug report: "
        let appVersion = Bundle.main.infoDictionary?["CFBundleShortVersionString"] ?? 1.0    // 앱 버전
        let osVersion = UIDevice().systemVersion    // 기기의 os 버전
        let message = """
        Hello,

        App Version: \(appVersion)
        iOS Version: \(osVersion)
        """

        if MFMailComposeViewController.canSendMail() {
            composerVC.mailComposeDelegate = self

            // Configure the fields of the interface.
            composerVC.setToRecipients([receiver])
            composerVC.setSubject(subject)
            composerVC.setMessageBody(message, isHTML: false)

            // Present the view controller modally.
            present(composer, animated: true, completion: nil)
        } else {
            // show failure alert
        }
    }

}
이메일을 보내는 동작을 하는 Swift 파일에서 import MessageUI를 추가하고 MFMailComposeViewControllerDelegate 프로토콜을 적용해야 합니다. 이메일 작성 화면을 보여주기 전에 항상 canSendMail 함수를 이용해서 사용자의 기기에서 이메일을 보낼 수 있는지 판단합니다. 보낼 수 없다면 사용자에게 안내해줍니다. 추가로 앱 버전 혹은 iOS 버전과 같이 필요한 정보들이 있을 수 있는데, 앱 버전은 Bundle에서 가져오고, iOS 버전은 UIDevice에서 가져올 수 있습니다.
MFMailComposeViewControllerDelegat 프로토콜을 적용해야 이메일 작성 화면을 dismiss 처리할 수 있는데, 바로 mailComposeController(_:didFinishWith:error:) 함수 안에서 dismiss 처리를 해야 합니다. 그리고 응답에 따라서 추가 액션을 취할 수 있습니다. (성공했을 때 성공 안내 메시지 노출 등)
1
2
3
4
5
6
7
8
9
10
11
12
13
14
// MARK: - MFMailComposeViewControllerDelegate
extension ViewController: MFMailComposeViewControllerDelegate {
    func mailComposeController(_ controller: MFMailComposeViewController, didFinishWith result: MFMailComposeResult, error: Error?) {
        // Check the result or perform other tasks.
        if result == .sent {

        } else {

        }

        // Dismiss the mail compose view controller.
        controller.dismiss(animated: true)
    }
}
서드파티 메일 앱으로 보내는 방법
다른 방법으로 이메일 작성하는 것은 mailto 스킴을 이용해서 URL을 만들고 엽니다. 만든 URL을 이용해서 다른 앱을 열어서 메일을 보내는 방법입니다. 예시 코드는 Gmail, Microsoft Outlook, 그리고 Spark 앱 url 만드는 방법입니다.
1
2
3
4
5
6
let subjectEncoded = subject.addingPercentEncoding(withAllowedCharacters: .urlHostAllowed) ?? subject
let bodyEncoded = body.addingPercentEncoding(withAllowedCharacters: .urlHostAllowed) ?? body

let gmailUrl = URL(string: "googlegmail://co?to=\(receiver)&subject=\(subjectEncoded)&body=\(bodyEncoded)")
let outlookUrl = URL(string: "ms-outlook://compose?to=\(receiver)&subject=\(subjectEncoded)&body=\(bodyEncoded)")
let sparkUrl = URL(string: "readdle-spark://compose?recipient=\(receiver)&subject=\(subjectEncoded)&body=\(bodyEncoded)")
URL을 이용해서 앱을 여는 방법이기 때문에 Info.plist 에서 관련 스킴을 추가해야 열 수 있습니다.
1
2
3
4
5
6
<key>LSApplicationQueriesSchemes</key>
<array>
    <string>googlegmail</string>
    <string>ms-outlook</string>
    <string>readdle-spark</string>
</array>
앱에서 열 수 있는지 판단을 하고 열 수 있는 메일 앱 URL을 사용하면 됩니다. AlertSheet를 이용해서 사용 가능한 이메일 앱의 목록을 보여주고 선택하면 해당 이메일 앱으로 가도록 하는 방법을 사용하겠습니다. 목록으로 나타날 때 표시하는 제목과 URL을 묶은 tuple로 만들고, 앱에서 열 수 있는 앱들 목록을 canOpenURL(_:)을 이용해서 걸러냈습니다.
1
2
3
4
5
6
7
8
let sendViaGmail = (url: gmailUrl, title: "Gmail")
let sendViaOutlook = (url: outlookUrl, title: "Outlook")
let sendViaSpark = (url: sparkUrl, title: "Spark")

let availableApps = [sendViaGmail, sendViaOutlook, sendViaSpark].filter { availableApp -> Bool in
    guard let url = availableApp.url else { return false }
    return UIApplication.shared.canOpenURL(url)
}
열 수 있는 앱들 목록을 이용해서 alertSheet을 만들어서 보여주거나, 만약 열 수 있는 앱들이 없다면 이메일을 보낼 수 없는 안내 alert를 보여주도록 하겠습니다. AlertSheet 목록에서 선택하면 open(_:options:completionHandler:) 이용해서 앱을 엽니다. Info.plist에 설정되어 있지 않으면 아무 동작하지 않기 때문에 꼭 설정해주세요.
1
2
3
4
5
6
7
8
9
10
11
12
13
14
15
16
17
18
19
20
21
22
23
24
25
26
27
28
29
guard !availableApps.isEmpty else {
    presentAlertCanNotSendEmail()
    return
}

presentAlertSheetThirdPartyEmailApps(availableApps)

...

private func presentAlertCanNotSendEmail() {
    let alert = UIAlertController(title: "Alert",
                                  message: "It seems there is no way to send email in your device. Please send email to bugReport@email.com",
                                  preferredStyle: .alert)
    alert.addAction(UIAlertAction(title: "OK", style: .default))
    present(alert, animated: true)
}

private func presentAlertSheetThirdPartyEmailApps(_ availableApps: [AvailableApps]) {
    let alert = UIAlertController(title: nil, message: nil, preferredStyle: .actionSheet)
    for app in availableApps {
        alert.addAction(UIAlertAction(title: app.title, style: .default, handler: { _ in
            guard let url = app.url else { return }
            UIApplication.shared.open(url, options: [:], completionHandler: nil)
        }))
    }
    alert.addAction(UIAlertAction(title: "Cancel", style: .cancel, handler: nil))

    present(alert, animated: true)
}
적용해보면 아래와 같은 스크린샷 모습을 볼 수 있습니다. 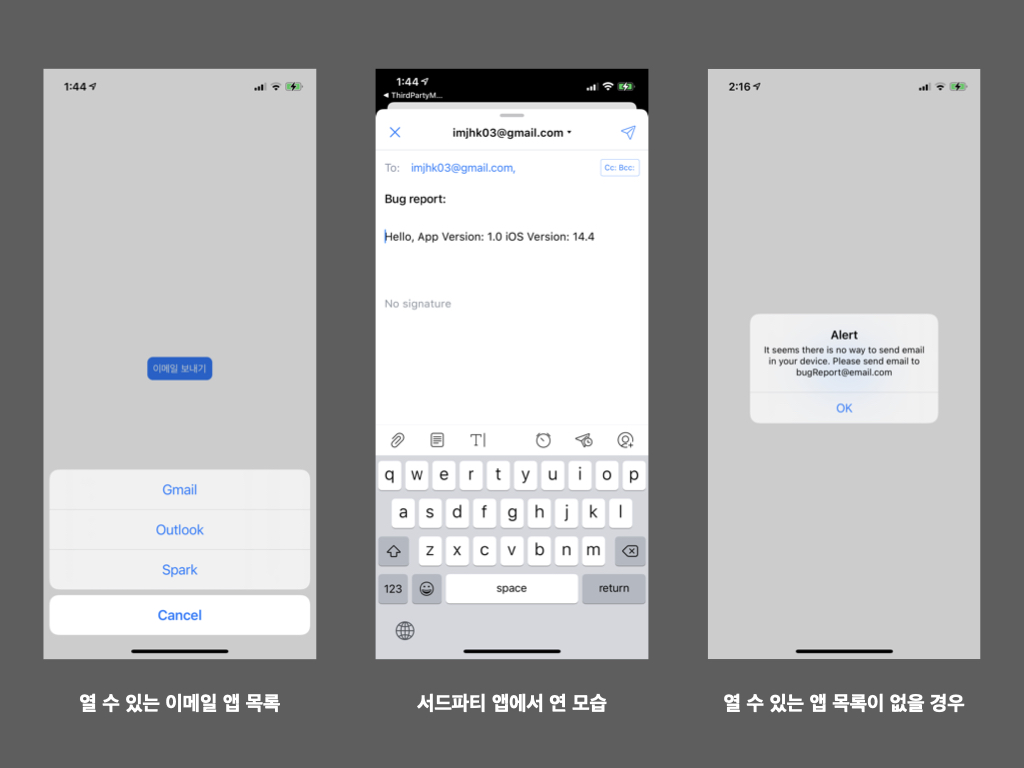
Warning: 이메일 앱을 보내는 것을 테스트하고 싶다면 iOS 시뮬레이터가 아닌 실 기기에서 테스트해야 합니다.
iOS 14에서부터 서드파티 앱을 기본 이메일 앱을 설정할 수 있는데, 이로 인해 대응할 방법을 소개했습니다. 전체 코드를 보고 싶다면 깃헙에서 확인할 수 있습니다.