SwiftUI에서 PreferenceKey 활용하기
하위 뷰에서 상위 뷰로 데이터를 전달하는 PreferenceKey 이해하기
Overview
SwiftUI에서 일반적으로 Environment나 ObservableObject를 통해 상위 뷰에서 하위 뷰로 데이터를 전달한다. 하지만 때로는 반대로 하위 뷰에서 상위 뷰로 데이터를 전달해야 할 때가 있다. 이럴 때 PreferenceKey를 사용한다.

PreferenceKey 구현하기
먼저 PreferenceKey 프로토콜을 구현해야 한다. 프로토콜에는 두 가지 필수 요구사항이 있다:
defaultValue- 기본값 지정reduce(value:nextValue:)- 여러 하위 뷰에서 값을 어떻게 병합할지 결정
이후 뷰에서 preference(key:value:) 수정자로 값을 설정하고, 상위 뷰에서는 .onPreferecenceChange(\_:perform:) 수정자로 변경을 감지한다.
다음은 텍스트 크기에 맞춰 상위 뷰의 크기를 자동으로 조절하는 예제이다.
preference(key:value:)
먼저 텍스트 너비를 측정하여 상위 뷰로 전달하는 컴포넌트를 만든다:
1
2
3
4
5
6
7
8
9
10
11
12
13
14
15
16
17
18
19
20
21
22
23
import SwiftUI

struct ChildCircleView: View {
    let text: String

    var body: some View {
        Text(text)
            .foregroundStyle(.white)
            .fixedSize()                  // **Important:** forces the Text to size itself to its content.
                                          // Without this, the parent initially proposes a width of zero,
                                          // so the Text collapses and never appears.
            .background(
                GeometryReader { geo in
                    // Measure the Text’s true width (including any padding you might add)
                    Color.clear
                        .preference(
                            key: ChildWidthKey.self,
                            value: geo.size.width
                        )
                }
            )
    }
}
이 코드에서는 .fixedSize()를 사용해 텍스트가 자신의 내용에 맞게 크기를 조정하도록 한다. 이 설정이 없으면 텍스트가 초기에 보이지 않을 수 있다. GeometryReader로 텍스트 뷰의 실제 너비를 측정하고, .preference(key:value:)로 측정된 너비를 상위 뷰에 전달한다.
PreferenceKey
여기서 defaultValue는 아직 측정이 이루어지지 않았을 때 사용할 초기값을 지정한다. reduce 함수는 여러 하위 뷰에서 값이 올라올 때 이를 어떻게 처리할지 정의한다. 이 예제에서는 단순히 가장 최근에 받은 값으로 업데이트하지만, 다른 시나리오에서는 최대값을 찾거나 모든 값의 합계를 계산하는 등의 방식으로 활용할 수 있다.
1
2
3
4
5
6
7
8
9
10
// Define a PreferenceKey to carry the child view’s width up to its parent
struct ChildWidthKey: PreferenceKey {
    // The default width before any measurement is made
    static var defaultValue: CGFloat = 0

    // When multiple values arrive, take the most recent one
    static func reduce(value: inout CGFloat, nextValue: () -> CGFloat) {
        value = nextValue()
    }
}
onPreferenceChange(_:perform:)
상위 뷰에서는 하위 뷰로부터 전달된 너비 값을 받아 활용한다:
1
2
3
4
5
6
7
8
9
10
11
12
13
14
15
16
17
18
19
20
21
22
23
24
25
struct ParentCircleView: View {
    let text: String
    @State private var childWidth: CGFloat = 0

    var body: some View {
        ChildCircleView(text: text)
            .onPreferenceChange(ChildWidthKey.self) { width in
                // Receive the child’s measured width and store it
                childWidth = width
            }
            // Size the parent frame to match the child’s width
            .frame(width: childWidth, height: childWidth)
            .padding()
            .background {
                Circle()
                    .fill()
                    .overlay {
                        Circle()
                            .stroke(lineWidth: 2)
                            .foregroundStyle(.white)
                            .padding(4)
                    }
            }
    }
}
이 코드에서는 .onPreferenceChange(ChildWidthKey.self) 수정자를 사용하여 하위 뷰로부터 전달된 너비 값의 변경을 감지한다. 이 값을 @State 변수에 저장한 후, .frame(width:height:) 수정자를 통해 뷰의 크기를 동적으로 조정한다. 여기서는 너비와 높이를 동일하게 설정하여 정사각형(원형 배경을 위한) 형태를 유지한다.
이제 텍스트 크기가 다른 상위 뷰를 묶어서 화면에 노출하면 하위 뷰의 텍스트 크기에 맞춰서 상위 뷰의 크기가 결정된다.
1
2
3
4
5
6
7
8
9
10
11
12
13
14
15
import SwiftUI

struct ContentView: View {
    var body: some View {
        HStack {
            // The parent circles will resize themselves based on their text
            ParentCircleView(text: "Stop Looking!")
                .foregroundStyle(.red)
            Spacer()
            ParentCircleView(text: "Start")
                .foregroundStyle(.green)
        }
        .padding()
    }
}
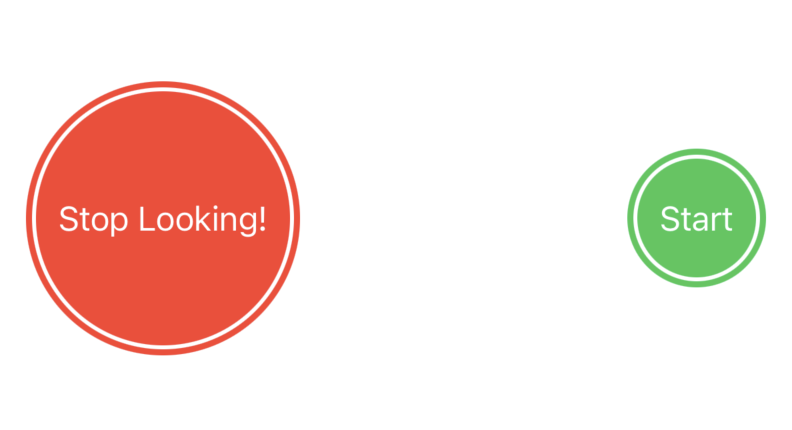
위 이미지를 보면 “Stop Looking!” 텍스트가 포함된 빨간색 원은 “Start” 텍스트가 있는 녹색 원보다 더 크게 렌더링된다. 이는 각 텍스트의 너비에 맞춰 상위 뷰의 크기가 자동으로 조정되었기 때문이다.
결론
PreferenceKey는 하위 뷰에서 상위 뷰로 데이터를 전달하는 강력한 메커니즘이다. 이 예제에서는 뷰의 크기를 동적으로 조정하는 간단한 사용 사례를 살펴보았지만, 이 패턴은 다양한 시나리오에서 활용할 수 있다:
- 스크롤 위치 추적
- 하위 뷰의 상태 변화 알리기
- 레이아웃 계산을 위한 geometry 정보 수집
- 오버레이 UI 요소의 상태 관리
참고
Preferences
[onPreferenceChange(:perform:)](https://developer.apple.com/documentation/swiftui/view/onpreferencechange%28:perform:%29){:target=”_blank”}