신규 프로젝트에 Swiftlint 적용하기
새로운 프로젝트 시작할 때 개발하기 전에 설정하는 것들이 있다. 최소 운영체제 버전을 설정하거나 지원되는 기기 등 여러 가지가 있다. 그중 하나는 스위프트 스타일이나 코드 포맷을 맞추기 위한 도구인 SwiftLint를 추가하는 경우가 있다. 시간이 지나 다시 신규 프로젝트를 만들 때 SwiftLint 추가하는 방법이 까먹을 때가 있다. 그래서 설정하는 것을 다시 볼 수 있게 기록해서 나중에 참고하고 싶다는 마음에 글을 쓰게 되었다.
이 블로그 포스트는 신규 프로젝트 생성할 때마다 SwiftLint를 적용하는 방법을 다루겠다.
이 포스트는 SwiftLint가 무엇인지는 자세히 다루지 않는다. Xcode, iOS Project, 기본적인 터미널 명령어를 다룰 줄 알아야 한다. 그리고 Xcode 15 이상, Apple Silicon에 Homebrew로 SwiftLint를 설치한 기준으로 설명되어 있다.
1. 설치하기
설치하는 방법은 여러 가지가 소개되어 있는데, homebrew로 설치하면 된다. 한 번 설치하면 다시 설치할 필요는 없다.
1
brew install swiftlint
Homebrew 이외 설치 방법은 SwiftLint 깃헙에 가면 볼 수 있다.
2. 프로젝트에 SwiftLint 추가하기
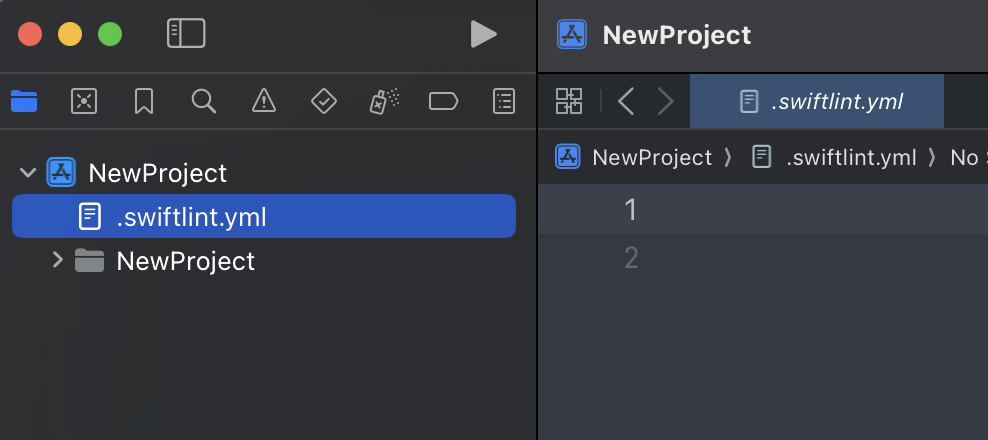
프로젝트에 새로운 파일 생성해서 '.swiftlint.yml' 파일을 만든다. 이 파일에서는 프로젝트에 맞게 규칙들을 설정하면 된다.
간단하게 SwiftLint 규칙들을 소개하면 아래와 같다. 이 규칙들 토대로 옵션들을 커스텀 할 수 있다.
- disabled_rules: 기본적으로 활성화된 규칙 집합에서 규칙을 비활성화한다
- opt_in_rules: 기본 집합에 포함되지 않은 규칙을 활성화한다.
- included: Linting 중에 포함할 경로. 대소문자를 구분한다.
- excluded: Linting 중 무시할 경로. 대소문자를 구분한다. included보다 우선 적용된다.
아래는 SwiftLint 깃헙에서 제공하는 규칙에 나온 .swiftlint.yml 파일의 예시다. 자주 쓰는 규칙들이 있다면 깃헙 레포에 저장하거나 gist 만들어서 복사 붙이기 하면 편하다. 나는 편하게 secret gist 파일 만들어서 썼다.
1
2
3
4
5
6
7
8
9
10
11
12
13
14
15
16
17
18
19
20
21
22
23
24
25
26
27
28
29
30
31
32
33
34
35
36
37
38
39
40
41
42
43
44
45
46
47
48
49
50
51
52
53
54
55
56
57
58
59
60
61
62
63
64
65
66
67
68
69
70
71
72
73
74
75
# By default, SwiftLint uses a set of sensible default rules you can adjust:
disabled_rules: # rule identifiers turned on by default to exclude from running
  - colon
  - comma
  - control_statement
opt_in_rules: # some rules are turned off by default, so you need to opt-in
  - empty_count # find all the available rules by running: `swiftlint rules`

# Alternatively, specify all rules explicitly by uncommenting this option:
# only_rules: # delete `disabled_rules` & `opt_in_rules` if using this
#   - empty_parameters
#   - vertical_whitespace

analyzer_rules: # rules run by `swiftlint analyze`
  - explicit_self

# Case-sensitive paths to include during linting. Directory paths supplied on the
# command line will be ignored.
included:
  - Sources
excluded: # case-sensitive paths to ignore during linting. Takes precedence over `included`
  - Carthage
  - Pods
  - Sources/ExcludedFolder
  - Sources/ExcludedFile.swift
  - Sources/*/ExcludedFile.swift # exclude files with a wildcard

# If true, SwiftLint will not fail if no lintable files are found.
allow_zero_lintable_files: false

# If true, SwiftLint will treat all warnings as errors.
strict: false

# The path to a baseline file, which will be used to filter out detected violations.
baseline: Baseline.json

# The path to save detected violations to as a new baseline.
write_baseline: Baseline.json

# If true, SwiftLint will check for updates after linting or analyzing.
check_for_updates: true

# configurable rules can be customized from this configuration file
# binary rules can set their severity level
force_cast: warning # implicitly
force_try:
  severity: warning # explicitly
# rules that have both warning and error levels, can set just the warning level
# implicitly
line_length: 110
# they can set both implicitly with an array
type_body_length:
  - 300 # warning
  - 400 # error
# or they can set both explicitly
file_length:
  warning: 500
  error: 1200
# naming rules can set warnings/errors for min_length and max_length
# additionally they can set excluded names
type_name:
  min_length: 4 # only warning
  max_length: # warning and error
    warning: 40
    error: 50
  excluded: iPhone # excluded via string
  allowed_symbols: ["_"] # these are allowed in type names
identifier_name:
  min_length: # only min_length
    error: 4 # only error
  excluded: # excluded via string array
    - id
    - URL
    - GlobalAPIKey
reporter: "xcode" # reporter type (xcode, json, csv, checkstyle, codeclimate, junit, html, emoji, sonarqube, markdown, github-actions-logging, summary)
이제 프로젝트 Build Phases에서 SwiftLint를 빌드 할 때마다 체크하게 스크립트를 만든다. Apple Silicon에 Homebrew를 설치했기 때문에 빌드 스크립트는 아래와 같이 작성한다. Homebrew가 Apple Silicon에서 기본적으로 바이너리를 /opt/homebrew/bin 폴더에 설치하기 때문이다.
1
2
3
4
5
6
7
8
9
10
11
if [[ "$(uname -m)" == arm64 ]]
then
    export PATH="/opt/homebrew/bin:$PATH"
fi

if command -v swiftlint >/dev/null 2>&1
then
    swiftlint
else
    echo "warning: `swiftlint` command not found - See https://github.com/realm/SwiftLint#installation for installation instructions."
fi
설치 방법에 따라 Run Script Build Phase의 셸 명령어 구문이 다를 수 있기 때문에 SwiftLint 깃헙에 Xcode Run Script Build Phase 부분을 참고해서 작성해야 한다.
스크립트를 작성하고 빌드를 하면 아래와 같이 처음에 에러가 발생할 수 있다.
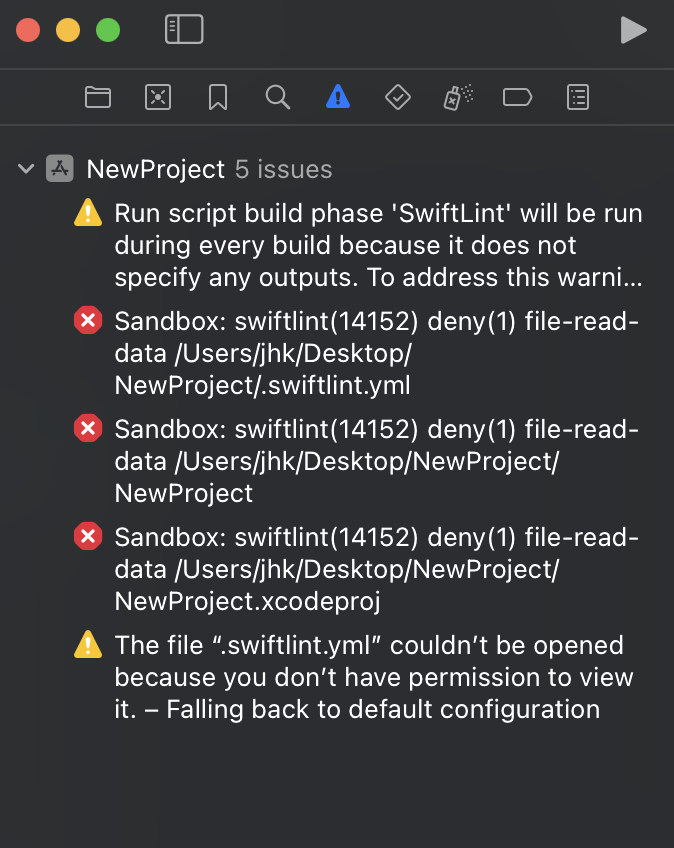
이는 Xcode 15부터 ENABLE_USER_SCRIPT_SANDBOXING의 기본 값이 NO에서 YES로 변경되었기 때문이다. 그 결과, SwiftLint는 파일 권한 부족과 관련된 오류에 직면하게 되며, 일반적으로 error: Sandbox: swiftlint(19427) deny(1) file-read-data라는 형태로 나타난다.
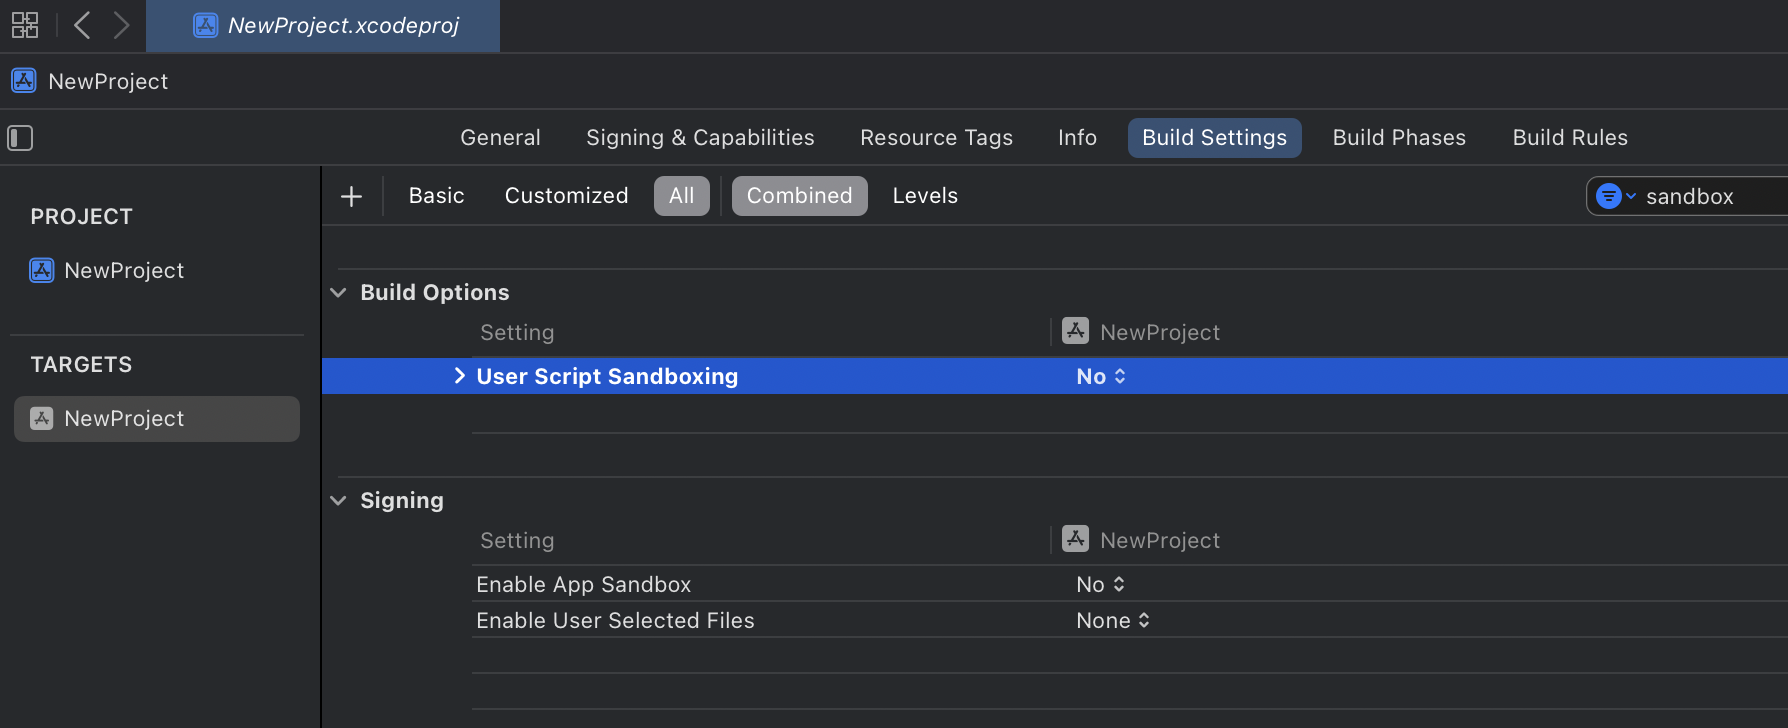
이 오류를 해결하기 위해서는 Build Settings에서 sandbox 검색해서 ENABLE_USER_SCRIPT_SANDBOXING 설정값을 NO로 변경하면 된다.
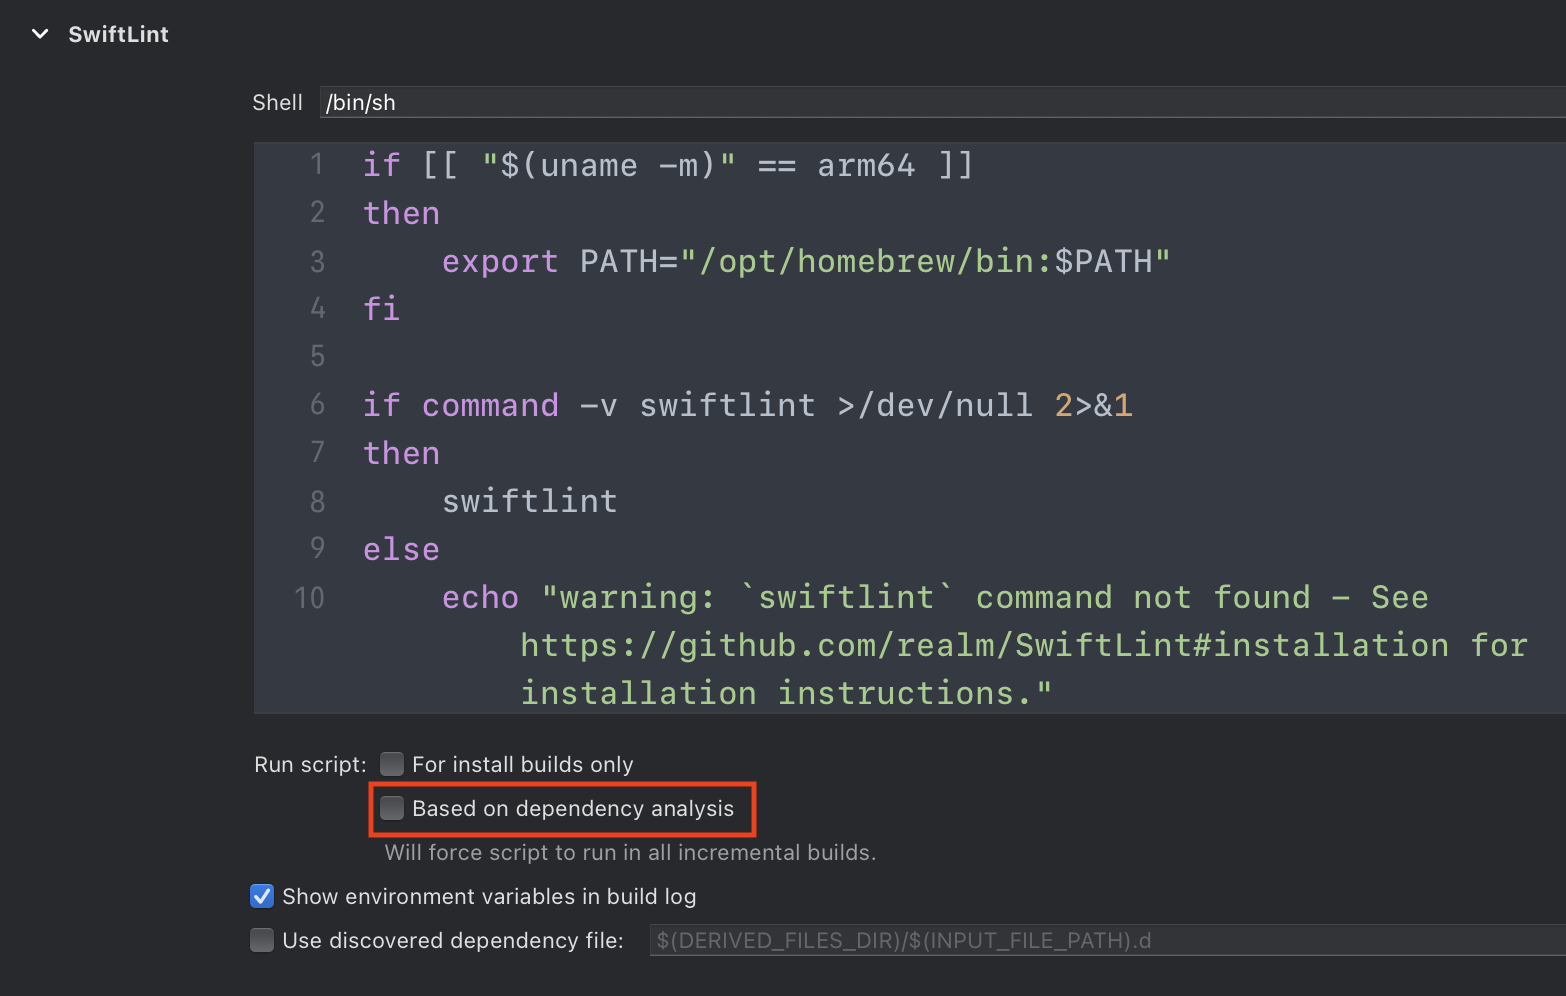
추가적으로 아래와 같은 경고가 뜬다.
warning build: Run script build phase ‘SwiftLint’ will be run during every build because it does not specify any outputs. To address this warning, either add output dependencies to the script phase, or configure it to run in every build by unchecking “Based on dependency analysis” in the script phase.
Xcode 14부터 발생하는 경고인데 빌드 할 때 마다 스크립트를 돌린다는 내용이다. 모든 파일을 항상 lint 하지 않도록 설정할 수 있지만, SwiftLint는 이미 꽤 빨라서 굳이 할 필요는 없다. 아래 Build Run Script Phase에서 체크 박스를 해제함으로써 경고를 없앨 수 있다. 추가적인 내용은 realm/SwiftLint#4015에서 볼 수 있다.
여기까지 설정하면 초기 프로젝트에서 빌드 성공하고 SwiftLint 규칙에 걸리는 오류들만 나타난다.
Conclusion
이 글에서 Homebrew를 이용해서 SwiftLint를 설치하고 프로젝트에 SwiftLint 적용하는 과정을 살펴봤다. SwiftLint는 팀의 코드 품질을 일관되게 유지하고, 개발자 간의 협업을 촉진하는 중요하고 좋은 도구이다. 코드 일관성을 유지하고 새로운 Swift 문법에 익숙해지도록 옵션을 설정하여 개발자를 지원할 수 있다. 새 프로젝트를 자주 시작하지 않더라도, 이 가이드를 참고하면 SwiftLint 설정 과정을 빠르고 정확하게 적용할 수 있을 것이다.
참고
realm/SwiftLint: A tool to enforce Swift style and conventions.
SwiftLintCore Reference
코드 리뷰를 개선할 수 있는 Danger + SwiftLint Plugin